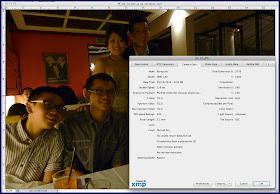
I estimate the photos were underexposed by at least 3 to 4 stops. I offered to "fix" for him and asked him to email the RAW files to me, but just as I thought the young man only shot in JPEG ;)
Beggars no chooser... JPEG then.
After I did some quick adjustment in Photoshop, I re post the fixed photos for him.
I got some nice comments for my "fixes", an ex-colleague in London commented...
"Wow CY can you give lessons on how to correct underexposed pix like these you worked on?"
Thus this write up ;)
Before I start I found out a few things about those underexposed pictures, by using "Get Info" in Photoshop; I am able to see the Meta Data in each picture.
For instance, I now know this picture was taken with a Panasonic Lumix DMC-LX3 camera, the shutter speed was a very low 1/8 second. "Portrait Mode" was set and at ISO 400, the camera decided NOT to fire the flash and to take the shot at a full aperture of f/2.0!
I think the failure here was the "Exposure Program" being set to "Portrait Mode", was that what made the "brain" in the camera decided NOT to flash thus underexposed the picture?
According to Panasonic...
"Panasonic has gone a big step further in the new LX3, upgrading every component to achieve a camera whose performance surpasses that of any compact camera that has come before. Simply put, the LX3 smashes all previous perceptions about the limitations of a digital compact camera, setting a lofty new standard in performance, quality and creative capabilities."
Ha ha ha...
Back to the fix...
First I open the picture in Adobe Camera Raw within Photoshop. ACR is a app inside PS where you can open and make adjustment and correction to your digital pictures.
Take Note of the adjustment sliders on the right of the app.
The first thing I will do is to adjust the "Fill Light" to make the picture brighter.
I do not use the "Brightness" or "Exposure" setting because I find Fill Light do the job better and do less damage to the file.
I will use the "Recovery" slider to claim back some highlight detail that were lost.
I will also try and correct the overall reddish lighting with the "Temperature" control.
Lets take a look below.
This is what happen after I crank the "Fill Light" to +70
Next I shift the "Temperature" to the left (more blue) at -55 it took off a lot of the yellow cast.
"Exposure" is set to +0.55 to brighten up the whole scene a little more.
"Recovery" to 25, recovering some lost highlight detail.
"Vibrance" is set to -21 and this make the skin tone more natural.
This is the result, look pretty good? Except for one problem... due to underexposure the picture, after lightened; show a lot of "noise" or "grain" (actually grain are only found in film). I will try and soften the "grain" to get a better looking image.
This is what happened if you really underexposed your digital pictures! Plenty of image noise and grain!
This is after I applied the "Despeckle" filter in Photoshop TWICE, better but still noisy.
Pulling all the stops, I put the image through Noise Ninja; my favorite digital noise removal.
This is the final result... much better!
Famous Last Words...
I hope I have confuse or bore you with the step by step instructions, find it hard to understand? Well, there is one SURE THING you can do to avoid going into all this trouble; GET YOUR EXPOSURE RIGHT!!
It is MUCH EASIER to read your camera instruction booklet and learn to use your camera properly than to learn Photoshop and picture manipulation!
You Might Also Like:
EXTREME MAKEOVER!


ouch! That`s a shame! They all look so happy too! what happened?
ReplyDelete